Though technology has made it easy for people to retrieve their lost photos and videos thanks to the development of new programs, the same technology has failed numerous people in return. It is therefore advisable to choose and use a program that not only guarantees the safety of your Samsung Galaxy s7/, s5/, s3/, s2, but also ensures that you will be in a position to retrieve all the lost photos with no glitches whatsoever. Once such program is dr.fone Android Data Recovery program.
dr.fone brags as being one of the leading data recovery softwares meant for Android smartphones. As a data recovery program, dr.fone allows you to search, preview, and recover your lost data in safe environment that guarantees you the safety of your Samsung Galaxy phone and the recovered files.
The dr.fone recovery software for Android gives you the freedom to recover your data from your Samsung Galaxy mobile device. The following is a detailed process on how you can do this.
Step 1: Connect Android Device to PC
The first thing to do is to connect your Samsung Galaxy phone to your PC. By default, dr.fone will detect your Samsung mobile phone.

You must also debug your smartphone before you can begin the data recovery process. The program will prompt you to enable debugging if you haven’t.

Step 2: Select Files to Be Recovered
Once your Samsung Galaxy has been full connected to the program, an interface that allows you to select the files to be recovered will be displayed. In this case, since we want to recover our photos, our selection will be “Gallery”. Check the “Gallery” box and click “Next”.

Step 3: Choose Data Recovery Mode
On your next interface, dr.fone will prompt you to select the desired mode of data recovery. Choose between Standard Mode and Advanced Mode, and check the warning box on your left-hand side. Click on the “Start” icon to initiate the data recovery process.

Tip: The time taken by the program to scan the Samsung Galaxy phone solely lies on the size of the lost data.
Step 4: Recover Data
Once the scanning process is over, preview the photos recovered and when satisfied, click on the “Recover” option.

Part 2: Recover Deleted Photos on Android SD Cards
The diversity nature of dr.fone allows you to recover data even from your SD Card. The following is a detailed process on how you can do this.
Step 1: Choose SD Card Data Recovery
Launch dr.fone data recovery program, and select “Android SD Card Data Recovery” option.

Step 2: Connect SD Card to PC
In this step, you can either choose to connect your SD Card directly to your PC or insert your card in your Samsung galaxy phone. Once your SD Card has been detected, click on the “Next” option to initiate the data recovery process.
Step 3: Choose Scan Mode
On your next interface, choose between the Standard and Advanced mode of data recovery. Make sure that you have read the nature of data recovery that the program is going use before proceeding. Once you have made your selection, click “Next” to start the data recovery process.

Step 4: Preview Recovered Data
Preview the recovered data by clicking on the “Gallery” option and select each and every photo that you would to recover. Once comfortable with your selection, click “Recover” to save your selected files.

Part 3: Recover Broken Photos from Broken Android Devices
If you might have damaged your phone accidentally, you can still recover deleted pictures from Android devices by using dr.fone data recovery program. The following is the data recovery process.
Step 1: Data Extraction
On your dr.fone interface, select the “Android Data Extraction” option. This option allows you to extract data from your damaged Samsung Galaxy phone.

Step 2: Select Data Extraction Option
The data extraction option gives you the opportunity to recover your photos from a phone that has a screen that doesn’t work, or a broken/black screen. Choose the extraction process that suits your situation.

Step 3: Select Device Name and Model
Once you have selected your preferred damaged phone, a new interface that shows your device name will appear. Select your model and click “Next”.

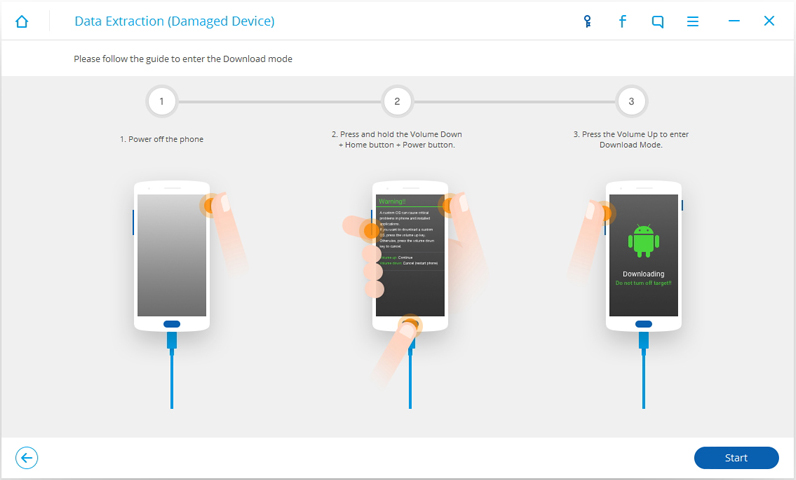
Step 4: Activate Download Mode
Before you can recover your photos, you must place your mobile phone in a download state. You can achieve this pressing the power, home, and volume up buttons on a concurrent manner. Once activated, press “Start” to proceed to the next step.

Step 5: Connect Device to PC
After you have activated the download mode, connect your phone to your PC and wait for the program to detect it. Once connected, the program will scan and preview the entire data.

Step 6: Recover to Device
Once you have selected the required photos, click on the “Recover” option. Your lost photos will be recovered and saved either in your SD Card or your PC.

Conclusion
Regardless of whether you might be using a Samsung Galaxy s7/, s5/, s3/, or s2, retrieving any lost photos is of the essence. As seen in this article, dr.fone should be the ideal data recovery program that each Samsung user should use to recover their data. Unlike other data recovery programs, dr.fone guarantees you tangible results, as well as the privacy and safety of any data present in your Samsung Galaxy. This makes the program one of the best data recovery programs that each Samsung Galaxy owner should have just in case they lose their photos.