
Read Part 1: How To Set Up Android Studio on 64-bit Windows 10?
In the last part, Android Studio in Windows 10, you were able to set up and configure the Android Studio IDE in Windows 10. In this part, you will explore the IDE, code editor, and work on your very first android application.
Note:
Having core Java or Kotlin knowledge is required for android development. Even without the above tech stack experience, you can try out the below example by checking out the git repo. Explaining every concept is beyond this article; hence we will learn the essential concepts on the go.
Let us understand a few terminologies and concepts essential to get started,
- Activity(in XML format): An android activity is a single screen in Android. A typical android application can have multiple activities such as login activity, home activity, and many more. In layman terms, a login activity is the first activity that we want to launch while opening an application.
- Activity(in Java): A typical android activity or view is associated with an activity java file that contains all the business logic, like what to do at the start of the activity, or what steps to follow while switching to other activities.
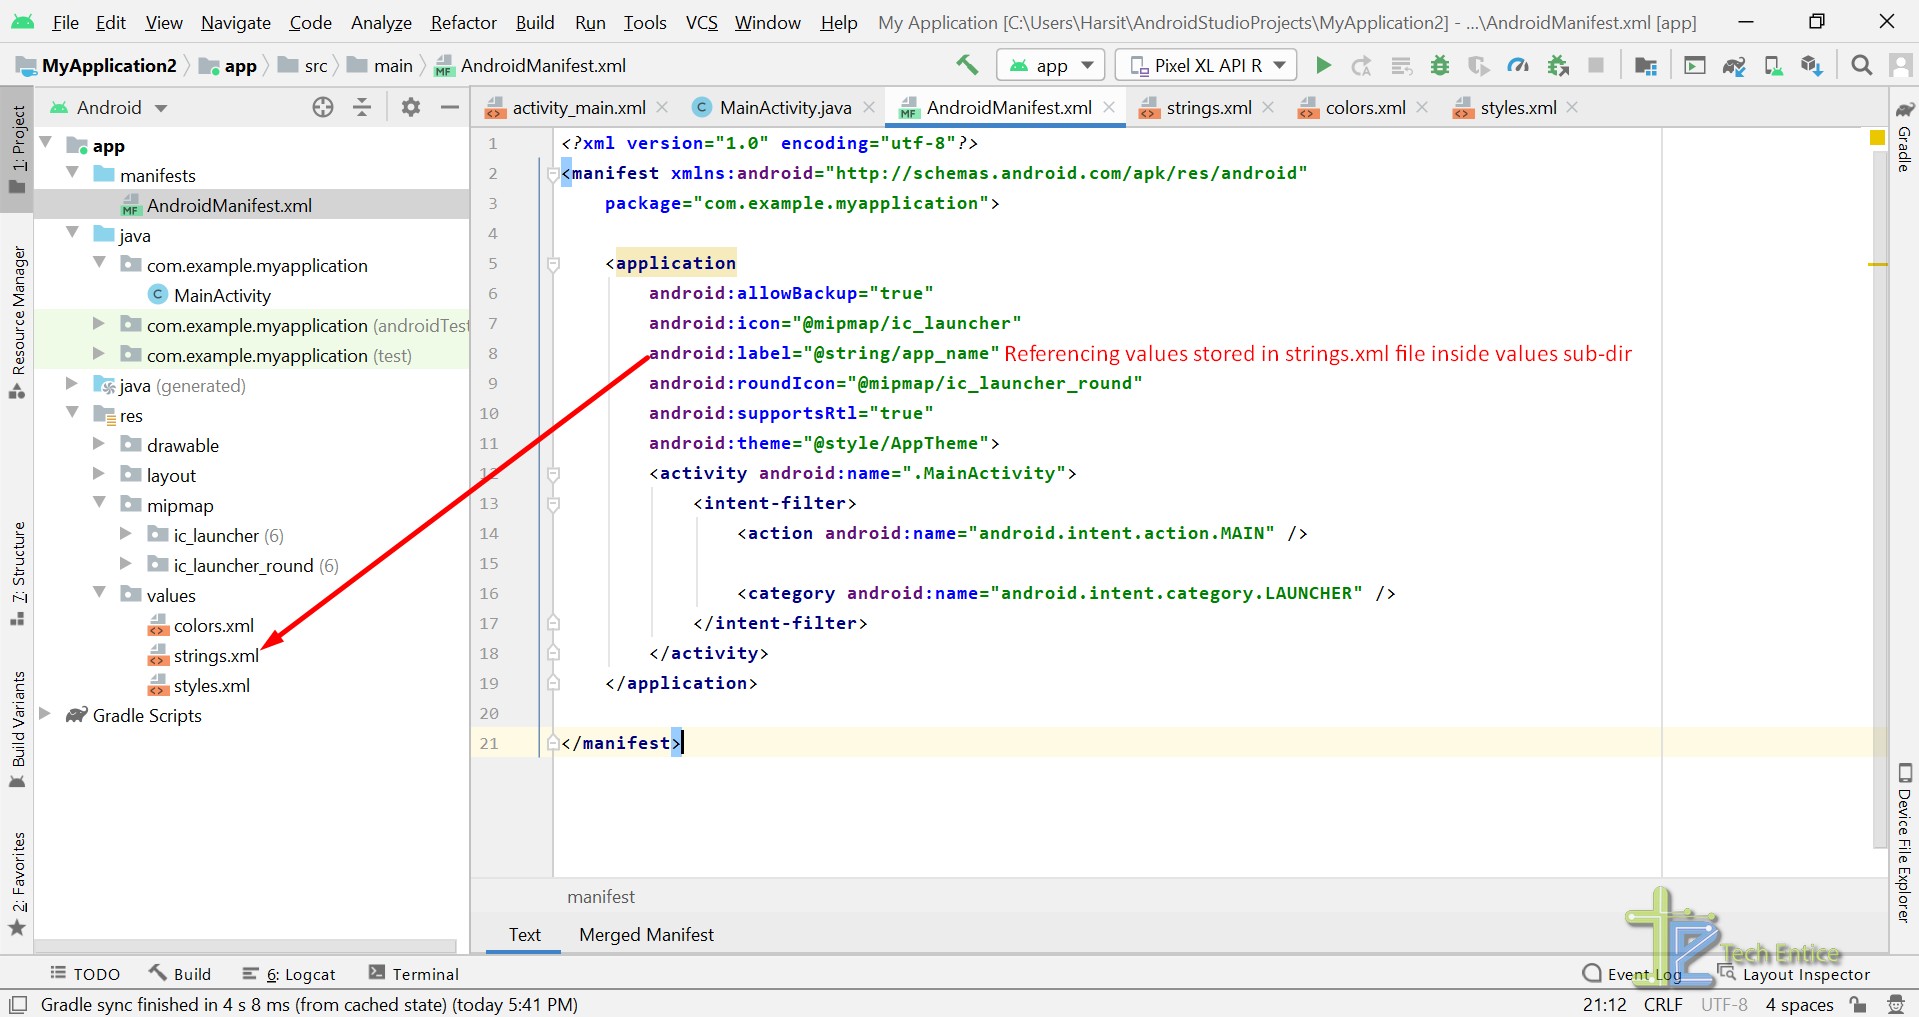
- Android Manifest(in XML format): Android manifest file is the heart of any android application. It contains all essential information, such as the name and icon of the app, package name, and the first Activity to be launched while opening the app.
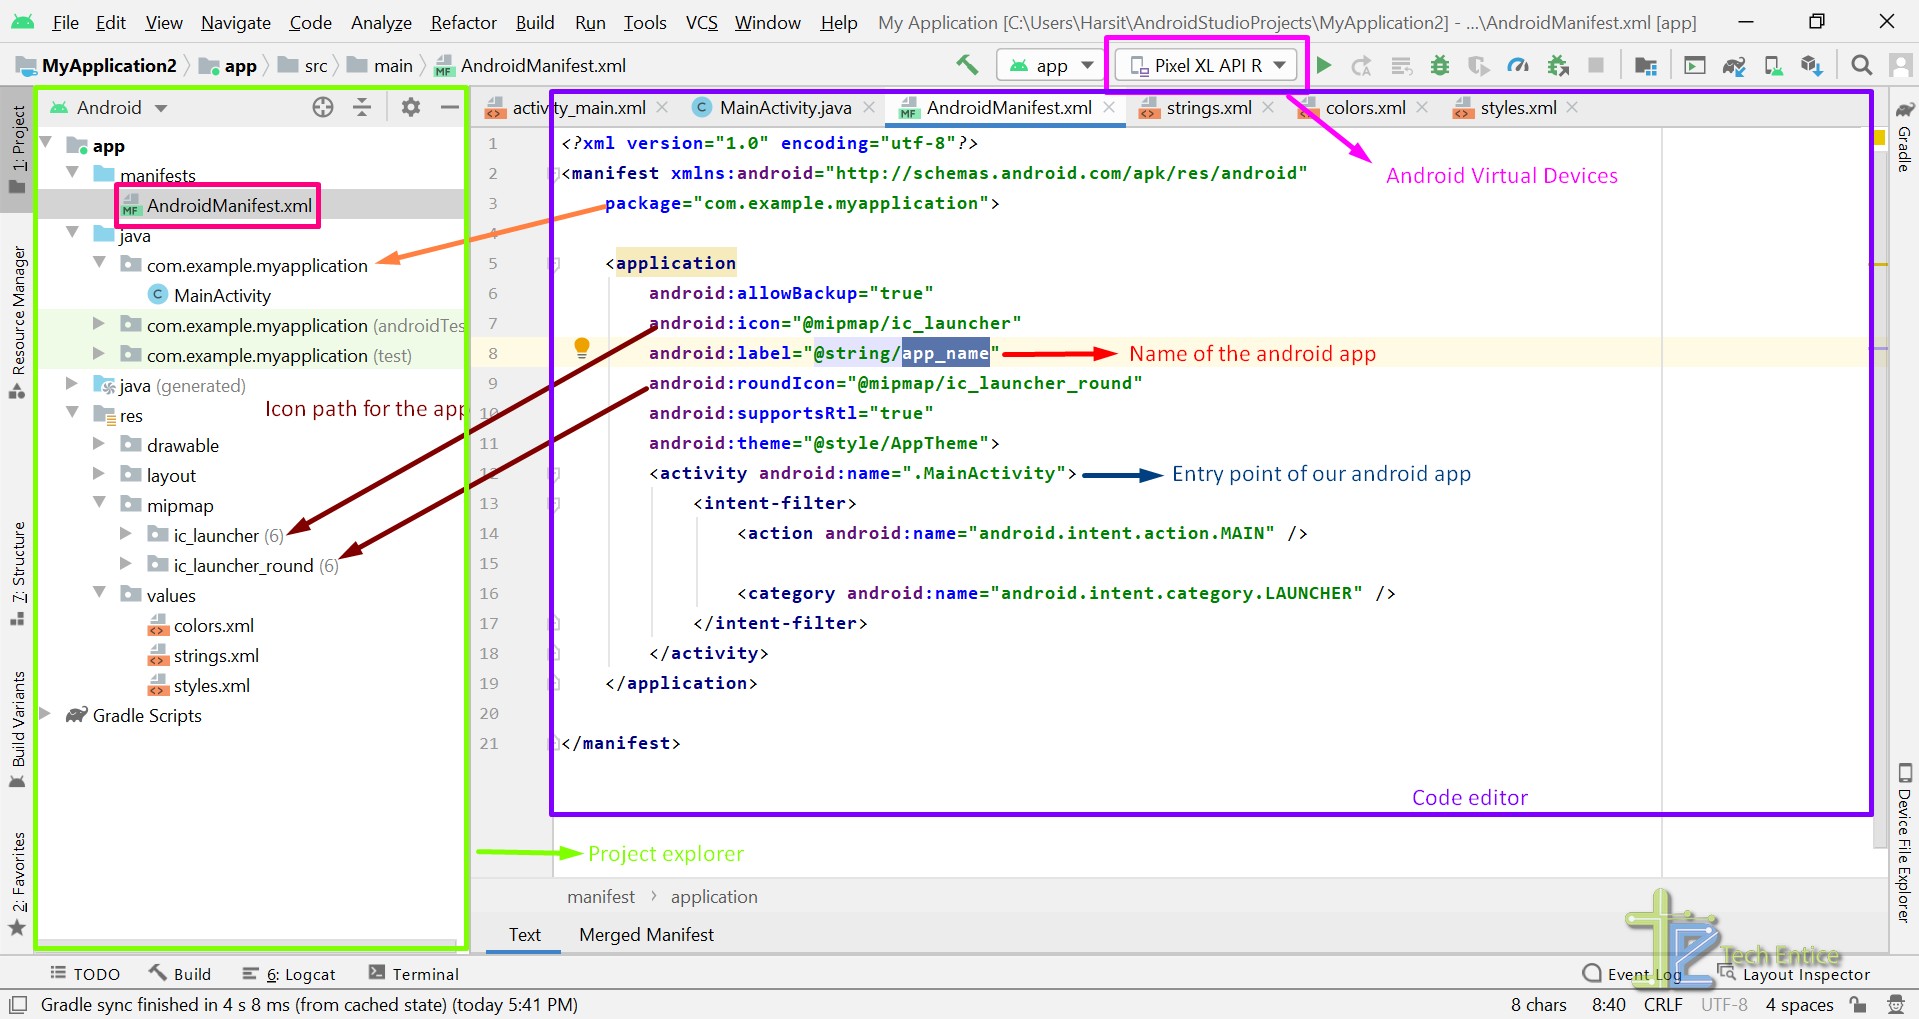
- Value files(in XML format): In software engineering, it is always a good practice to store values in a central location for easier management. A value might be the name of the app, the navigation bar’s color, or even some external api url. So the next time you need to change the navigation bar’s color or change the text size, you don’t need to search throughout the codebase. You can directly update the value of the properties from the values directory.
If you have followed the previous article by now, you should be ready with a sample android project, and we are good to start crafting our android application.
Example Application Summary:
We will create one easy android application having two activities and navigation between two activities as mentioned below,
- Activity_Main.XML: This Activity will be launched at the start of the android application. The main Activity displays a welcome message and contains a button to navigate to the next Activity.
- Activity_Home.XML: This Activity will be launched upon clicking the Home button present in the previous Activity. The home activity displays a message saying, “Welcome to Home Layout.”


Design the UI:
Step #1:
- Let us first design a simple layout, Activity_Main. In this section, we will learn about the different types of layouts available for android devices.
- For keeping the application simple, we shall use the LinearLayout throughout this section.
- Linear layouts are the simplest form of view groups in Android. They align all the child elements in a single direction, either vertically or horizontally.
- In our case, we kept all the elements like text boxes and a button vertically.

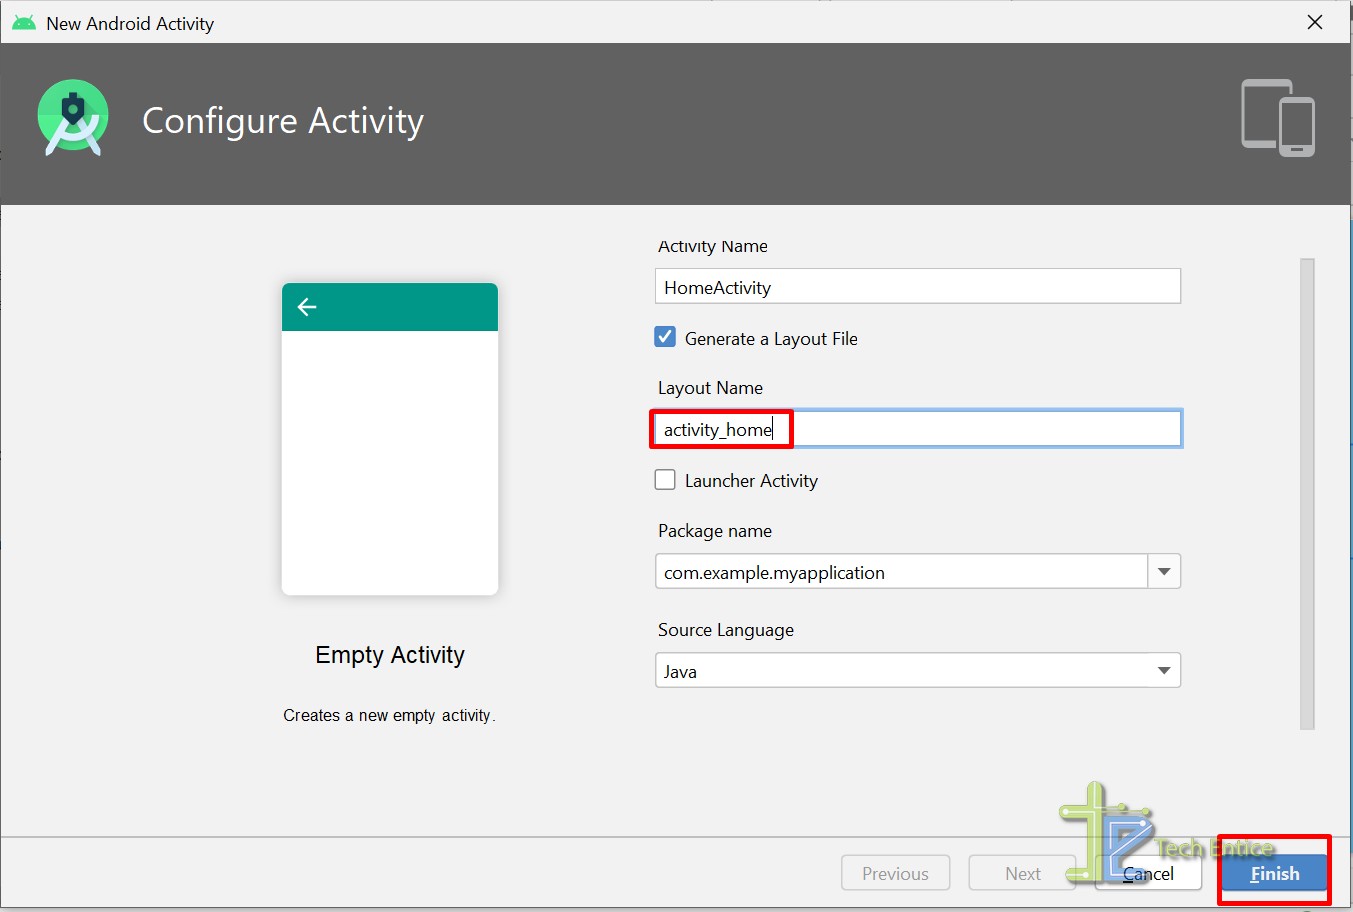
Step #2:
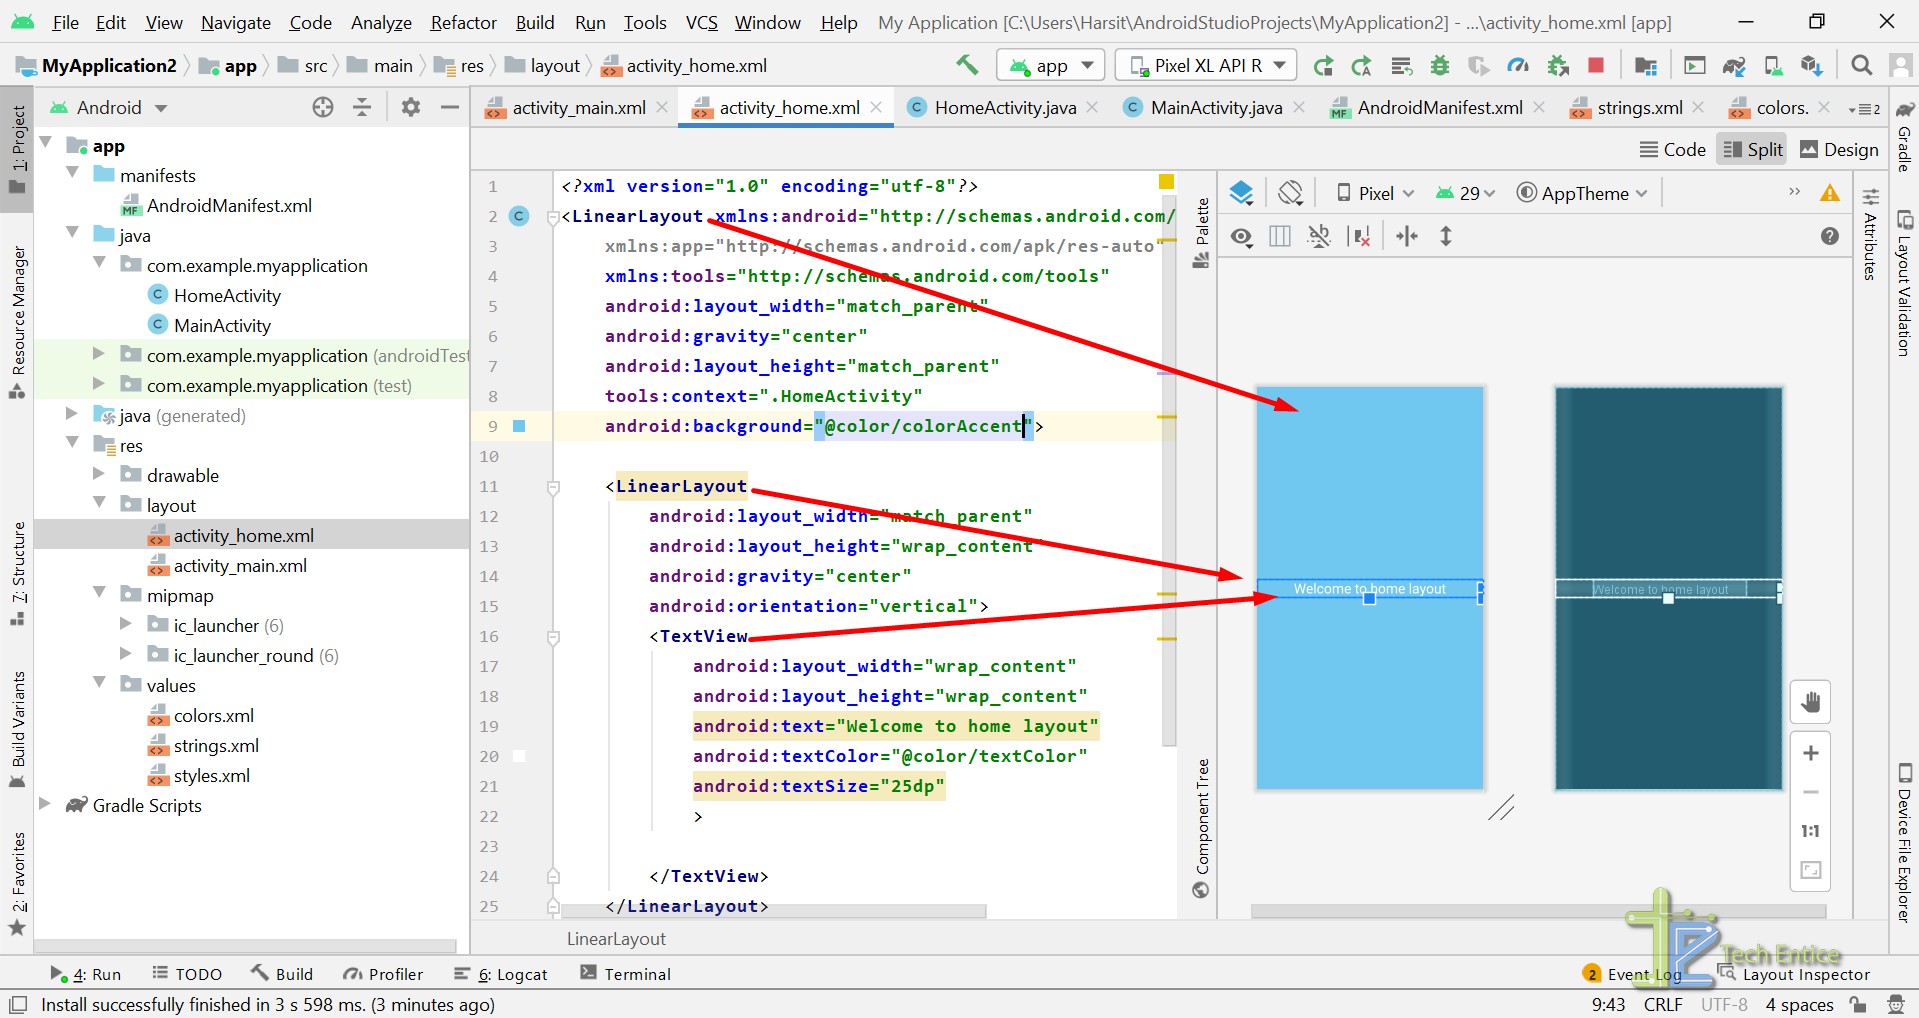
- Now let’s create a new layout named activity_home.
- First right click on package subdirectory and hover over New then Activity and click on Empty Activity option.
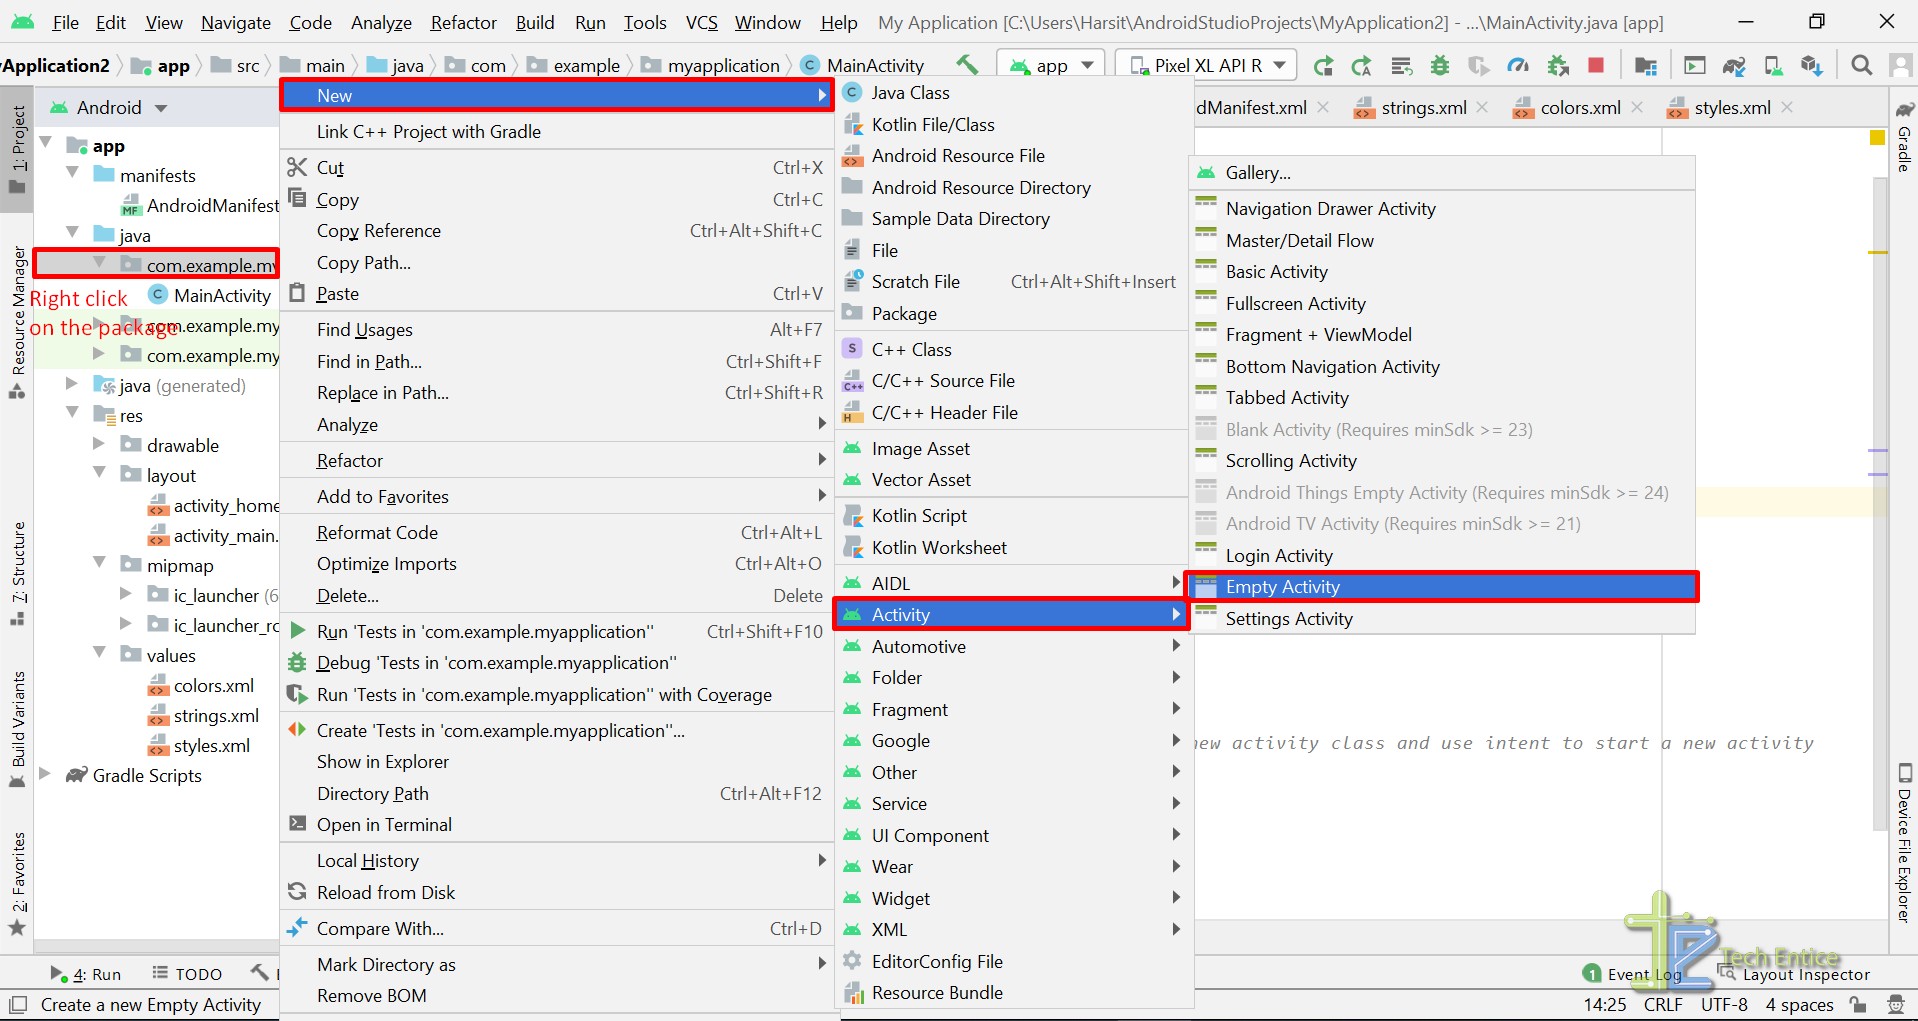
- Android studio will present you with a dialog box to customize the layout.
- For our requirement, we can update the name of the layout and then click on the finish button.
Step #3:
- Let us design the user interface of home activity. For this activity, we will be having a text view inside nested linear layouts.
Coding part:
- Navigate to the MainActivity.java, and we shall write an onClick event on the HOME button.
- Upon clicking the HOME button, open the home layout that we created in the previous step.
Before we begin, let’s first understand the activity life cycle. For all android applications, the below-mentioned activity life cycle applies, starting from launching the activity until moving to some other activities or closing the app from the running activity.
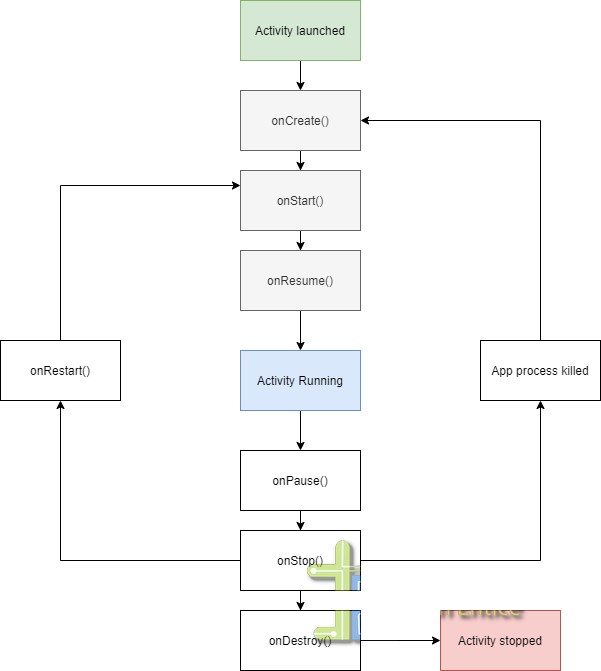
- Every android activity has to go through the activity life cycle. Activities might skip some of the states, depending on the users’ usage.
- Android provides default methods for all the mentioned stages for an activity.
- Commonly, the developers would override the default methods and implement the business logic inside the overridden methods. Let’s say you want to display a payment reminder message to the user at the start of the activity; then, you have to override the onCreate() method for the given activity and write your business logic inside the method to display a message.
- In our case, we rendered a view for the MainActivity by overriding the onCreate() method.
The onCreate() method:
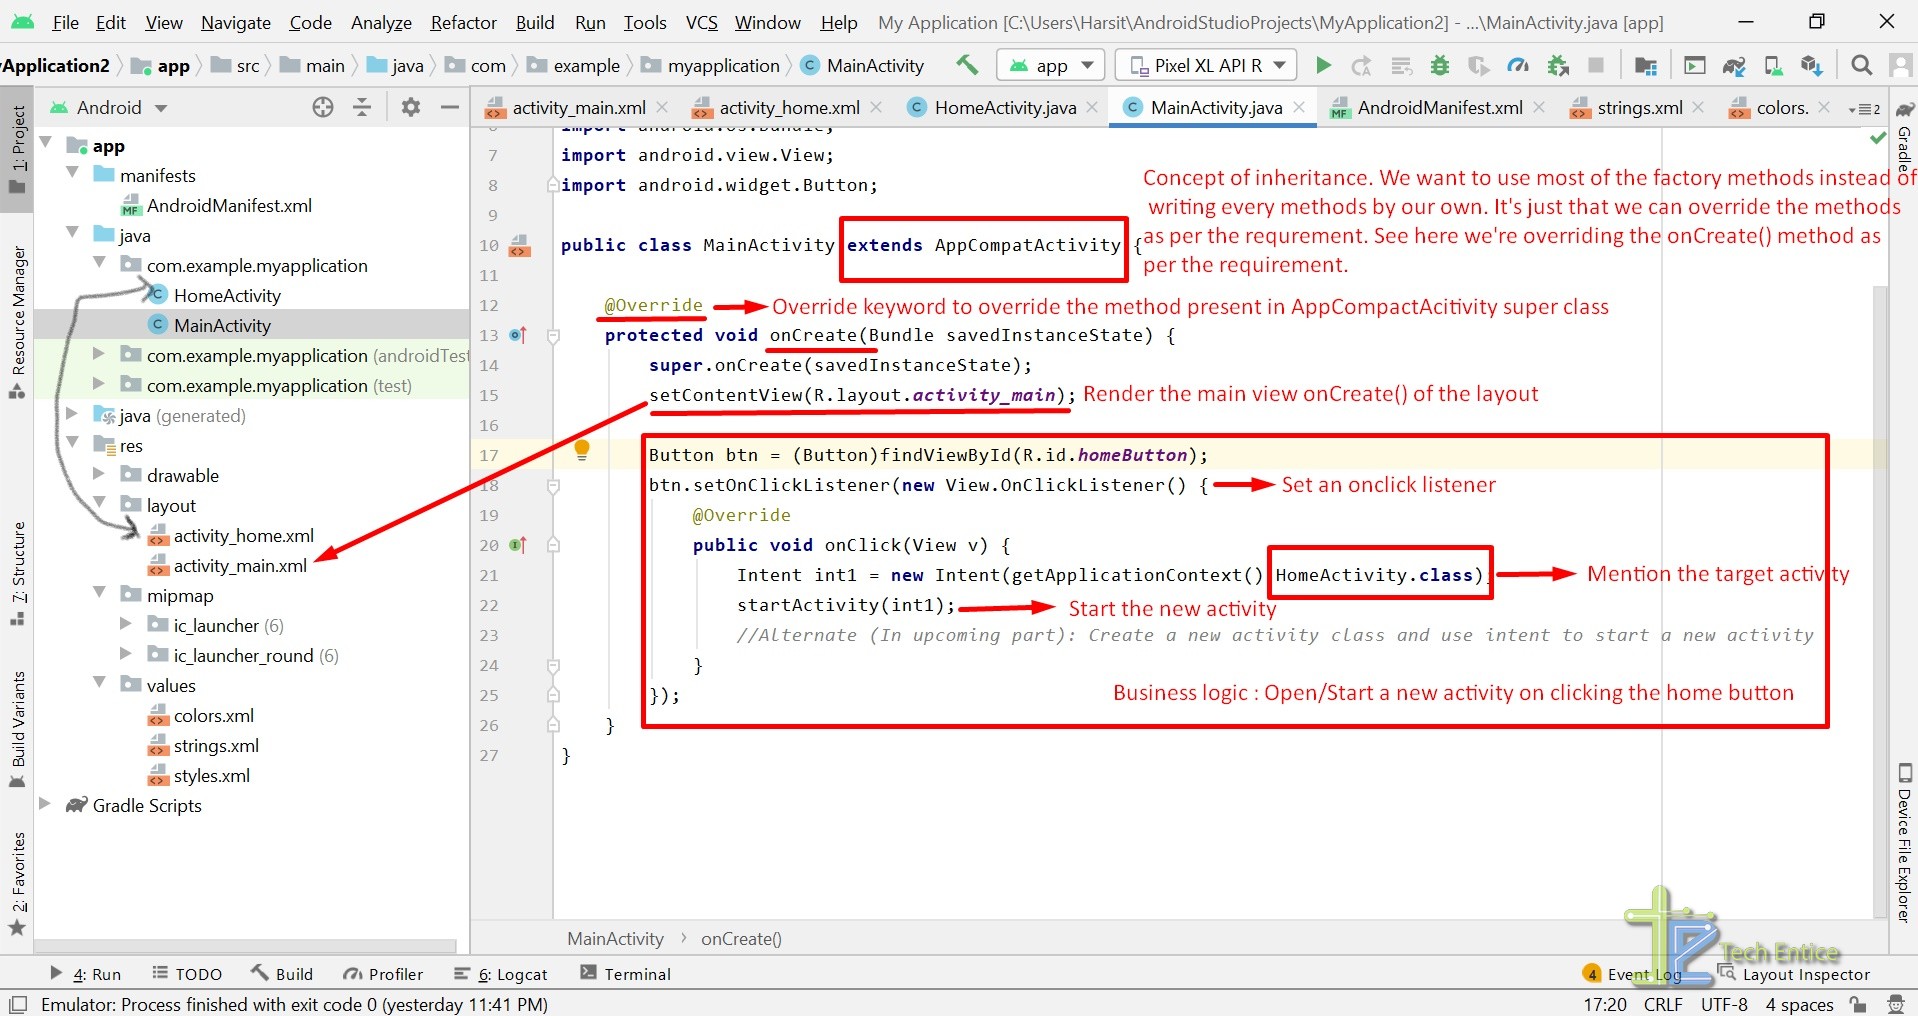
- In our case, we will override the onCreate() present in the AppCompatActivity superclass.
- As we discussed earlier, Android provides the wrapper methods(like onCreate() and so) by hiding the background details so that we can focus more on the business logic from day one itself. To get started, we first need to call the superclass’s onCreate() method to implement the required functionalities.
Now we are good at implementing our business logic. Let us set the view by calling setContentView() method. We need to pass the name of the layout( there in xml format, the view) to this method to render the designed activity on the screen.
The R class:
- R is the name of the resource class generated during the build process.
- It contains references to all the layouts, ids, images, string, and colors.
- In our case, to get the reference to the view layout, we need to refer to this, R.layout.activity_main.
Now we can set the current view by passing the R class reference to the setContentView() method like this, setContentView(R.layout.activity_main).
The Intent class:
Now we need to attach an onClick event listener to the HOME button and need to start a new activity. Please refer to the below screenshot to understand each step thoroughly.
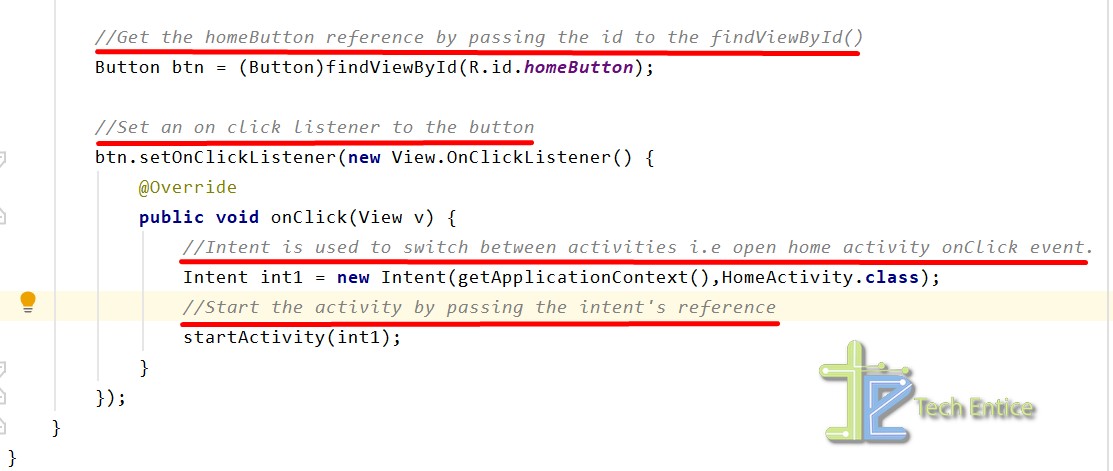
- Intent class is used to switch between android activities.
- In our case, we are starting the home activity upon clicking the HOME button from the main activity.
- The Intent constructor takes two arguments. The first one is the name of the current activity, and the second one is the target activity we want to launch.
Code sample, Intent(getApplicationContext(),HomeActivity.class)
Now our android application is ready to get installed in our emulator or connected Android device. Let’s hit Shift+F10 to start the build process and later install the application. You shall be able to see the installed application named “My Application” in your app drawer and click it to launch your android application.
Summary:
In this article, we created a simple android app having multiple views and added navigation between two activities. In the next part, we shall focus on developers and debugging tools.
Read Part 3: How To Explore Gradle, ADB Debug Tool, Logcat, Lint Tool In Android Studio On Windows 10?