It is sad to break this to you, but there is no permanent way to enable Flash in Chrome. Flash is blocked by default on the browser and can only be enabled for a whole website or specific content. So, whether you download Chrome for Windows 7 or any other Windows, you will have to activate it before you can use it on any page.
You are probably here thinking “Wow, Google Chrome must really not like Flash!” Well, that’s so true. Google doesn’t like Flash, and we can understand why. Flash is inherently flawed with a million and one security issues.
We know it, Google knows it, even Adobe-the creators of this technology-knows it, and they want us to stop using it. That is why Google Chrome is set up in such a way not to support it entirely while still giving the people what they want–however temporarily.
But, although Google Chrome and other web browsers have succeeded in pushing Flash to extinction, there are still several websites that use it. These websites have made it difficult for Google to eradicate Flash from Google Chrome completely.
So, maybe you really need to have Flash on your Google Chrome to access any of these sites, no worries, we are here to teach you how to enable Flash on your Chrome.
STEP 1. Firstly, download Chrome for Windows 7 or any other windows. Install it and launch your Google Chrome website browser, then access the menu from the top right corner of the window. This will be the three dots stacked on top of each other. Clicking them will bring out a pull-out menu.
STEP 2. Scroll down until you get to the settings menu. Click on it
STEP 3. A new window will be opened on your Google Chrome web browser.
STEP 4. Scroll down until you get to the advanced settings. Click on it to expand it and then move to the ‘privacy & security’ tab.
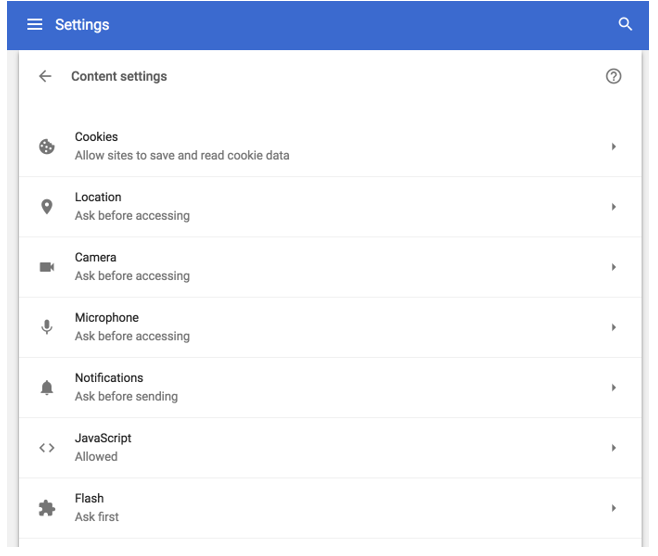
STEP 5. Once there, click on the site settings. Alternatively, you can type: Chrome://settings/content in the address bar to access the site settings directly from step 2

STEP 6. Next, scroll down until you see the flash option. It is usually towards the end of the content menu, under the Javascript option. Click on it.
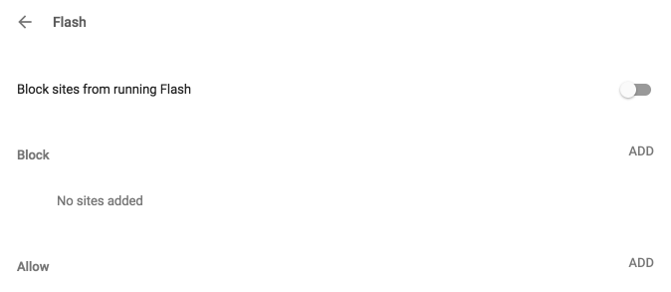
STEP 7. It will take you to another page. There, you will see the option ‘block sites from running flash’ turn this off. Once done, you will realize the feature has been set to ‘ask first.’ This means that when next you encounter a flash plugin, Chrome will ask you if you want to activate it.
How to Activate Flash on your Chrome
Now that you have enabled Flash on your Chrome, you need to activate it. This can be done in a few easy steps;
STEP 1. In your address bar, type the URL of the site that requires the Flash, and press enter.
STEP 2. Since we asked Google Chrome to ask us if we want to activate Flash, anytime we encounter a site that uses Flash, this is exactly what Google Chrome will do. You will notice a grey box with the sentence ‘click to enable adobe flash player’ on it. On this otherwise blank box will also be the outline of a puzzle piece. This piece is where the flash plugin is located.
STEP 3. Click the plugin. A pop-up box will appear asking you to run Flash. Click the allow button at the bottom right corner of this box. Doing this will reload your current page.
STEP 4. Now, you can enjoy whatever it is you needed the Flash installed for.
The good thing about this is that although Flash cannot be installed permanently, because you have already installed it for this page, you won’t have to install it again for this particular URL. It doesn’t matter if you are doing something different from what you did previously, as far as it is being done on the same page, the Flash will always work.
How to Enable Flash on your Chrome Through Site Address
A more direct way to enable Flash on your Google Chrome will be to go directly through the site address:
STEP 1. Firstly, download Chrome for Windows 7 or any other windows. Install it and launch your Google Chrome website browser. Then, type the URL of the flash site you want to access. It doesn’t matter if the site is built entirely in Flash or just hosts an individual Flash content. You need to be security conscious whichever the case because Flash is a significant security threat.
STEP 2. The page will open as best as it can, but the full functionality will not be evident because of the absence of an enabled Flash.
STEP 3. You will notice a padlock/ information symbol at the left hand of your URL in the address bar. Select it.
STEP 4. A drop-down box will appear next to the Flash in the site’s settings. Click Allow.
STEP 5. Clicking allow will enable Flash across the entire website; however, if this isn’t what you want, move on to step 6.
STEP 6. Right click on the padlock, a pop-up window will appear. Select enable Flash from the pop-up window. A notification will appear. Click allow and start enjoying the Flash on your site.